Privacy statement: Your privacy is very important to Us. Our company promises not to disclose your personal information to any external company with out your explicit permission.
The method steps are as follows:
(1) First tighten the chamfered positioning pin on the workbench.
(2) Then install the pad and the cylindrical positioning pin, but the cylindrical positioning pin can not be fastened, but a certain pre-tightening force can be given.
(3) Use the dial indicator to find the center axis of the two pins and make them horizontal and enter the CNC machine.
(4) Mount the workpiece and press the platen.
(5) The CNC machine tool executes the programmed NC program, first machining the outer arc and then chamfering.
(6) Remove the workpiece, turn it over and re-clamp, and machine the reverse chamfer.
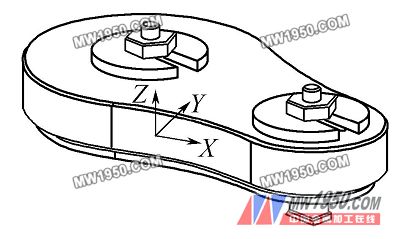
Figure 3 is a diagram showing the effect of workpiece clamping. After several batches of parts production practices, I found that there are still many problems:

image 3
First of all, the alignment of the workpiece and the tool setting are still troublesome. For example, the alignment of the workpiece can only measure the outer circle of two cylinders with a dial gauge, and because of the edge-cutting pin used, the alignment is more inconvenient and the error is sometimes larger.
Secondly, because the whole workpiece is pressed and positioned by two T-shaped blocks, bolts, nuts and pressure plates during the machining process, the degree of fastening is somewhat insufficient, and slight displacement occurs under the action of cutting force during the machining process. The chamfering of the reverse contour often occurs on one side and no side.
In addition, once the fixture is loose, it must be re-aligned. For this kind of problem, I think the key lies in the fixture, the fixture is not solved, the efficiency and precision will be impossible to talk about. So I made further improvements to this fixture.
3. Problem handling
So how to solve such problems, so that we can improve the efficiency and increase the rigidity of the fixture as much as possible during the machining process, I conceived to design a fixture that can achieve the following functions:
(1) Fixing the fixture on the machine tool no longer passes the arc but becomes a line using the dial gauge, which simplifies a lot.
(2) Combining several fixture parts into one reduces the positioning error and increases the rigidity.
(3) The force point of the clamping force is changed, and the stability during the processing is improved.
The overall structure of the fixture is shown in Figure 4:

Figure 4
Previous page next page
June 09, 2023
Mail a questo fornitore

Privacy statement: Your privacy is very important to Us. Our company promises not to disclose your personal information to any external company with out your explicit permission.

Fill in more information so that we can get in touch with you faster
Privacy statement: Your privacy is very important to Us. Our company promises not to disclose your personal information to any external company with out your explicit permission.